Create a High-Performance REST API with Rust
Building a high-performance REST API is crucial for modern applications that demand speed, scalability, and efficiency. Rust, with its memory safety, zero-cost abstractions, and performance capabilities, is an ideal choice for developers who need to push the boundaries of what their APIs can achieve.
In this tutorial, we'll walk through creating a high-performance REST API using Rust and the Axum web framework, which provides a powerful and ergonomic foundation for building APIs.
What is a REST API?
A REST API (Representational State Transfer Application Programming Interface) is a way for two systems to communicate over HTTP, often used for web services. It allows clients (such as web browsers or mobile apps) to interact with servers by making requests and receiving responses. REST APIs follow a stateless, client-server model and use standard HTTP methods like:
- GET: Retrieve data from the server.
- POST: Send data to the server to create a new resource.
- PUT: Update an existing resource on the server.
- DELETE: Remove a resource from the server.
REST APIs are designed to be simple, scalable, and flexible, making them ideal for building web services that can be consumed by a variety of clients. They use standard formats like JSON or XML for data exchange, allowing for easy integration across different platforms.
In this API that we'll build, we'll use PostgreSQL as the database, SQLX for database interactions, and Axum as the web framework to handle HTTP requests and responses.
What is SQLX?
SQLX is a Rust library that provides a compile-time checked, asynchronous interface for interacting with SQL databases. Unlike traditional ORMs, SQLX directly executes raw SQL queries, offering more control over the database operations while ensuring safety by checking the queries at compile time. This helps catch errors early in the development process, providing the benefits of both SQL and Rust's strict type system.
SQLX supports several databases, including PostgreSQL, MySQL, and SQLite. In this project, we're using it with PostgreSQL, allowing us to perform efficient queries and transactions while benefiting from Rust's performance and safety guarantees.
Overview of the Project
In this tutorial, our goal is to build a high-performance REST API having all the CRUD operations (Create, Read, Update, Delete) for managing posts and users. Here's what we'll build:
- GET /posts: Retrieve a list of all posts.
- GET /posts/:id: Retrieve a specific post by its ID.
- POST /posts: Create a new post.
- PUT /posts: Update an existing post.
- DELETE /posts: Delete an existing post.
- POST /users: Create a new user.
We will be working with two database tables:
- Posts: To store the post content and metadata.
- Users: To manage the users who can create and interact with posts.
Spinning Up a New PostgreSQL Database Using Docker
Before we start building the API, we need a PostgreSQL database to store our data. We'll use Docker to create and run a PostgreSQL container, which will serve as our database server.
Install Docker
If Docker is not installed on your machine, download and install it from Docker's official website. Verify the installation by running:
docker --versionStart a PostgreSQL Container
Now, let's create and run a PostgreSQL container with the following command:
docker run --name rust-postgres-db \
    -e POSTGRES_PASSWORD=password \
    -e POSTGRES_USER=postgres \
    -e POSTGRES_DB=rust-axum-rest-api \
    -p 5432:5432 \
    -d postgres
Here's what each part of the command does:
--name rust-postgres-db: Gives the container a name.-e POSTGRES_PASSWORD=password: Sets the password for the PostgreSQLpostgresuser.-e POSTGRES_USER=postgres: Creates a user namedpostgres.-e POSTGRES_DB=rust-axum-rest-api: Creates a database namedrust-axum-rest-api.-p 5432:5432: Exposes PostgreSQL on port 5432, which is the default PostgreSQL port.-d postgres: Runs the container in detached mode using thepostgresimage.
Persisting Data (Optional)
If you want to persist data between container restarts, you can mount a volume. Here's an updated command with volume support:
docker run --name rust-postgres-db \
    -e POSTGRES_PASSWORD=password \
    -e POSTGRES_USER=postgres \
    -e POSTGRES_DB=rust-axum-rest-api \
    -p 5432:5432 \
    -v pgdata:/var/lib/postgresql/data \
    -d postgres
This command creates a named volume pgdata that will store your database files, ensuring the data is not lost when the container is stopped.
Setting up the Rust Project
To begin building the API, we need to set up the basic structure for our Rust project. Using Cargo is the most common way to manage Rust projects, as it handles dependencies, building, and running the project.
Create a New Rust Project
To create a new Rust project, run the following command:
cargo new rust-axum-rest-api
cd rust-axum-rest-api
This creates a new directory called rust-axum-rest-api, which includes a basic project structure with:
rust-axum-rest-api/
├── Cargo.toml
└── src/
    └── main.rs
Setting Up SQLX
To set up SQLX in your Rust project and configure it for PostgreSQL with TLS support, follow these steps:
Add SQLX to the Project
First, add the SQLX dependency with the appropriate features for your setup. Since we're using Tokio as the runtime, PostgreSQL as the database, and native TLS for secure connections, run the following command:
cargo add sqlx --features runtime-tokio,tls-native-tls,postgresThis command adds SQLX to your Cargo.toml with support for:
- runtime-tokio: Using Tokio as the async runtime.
- tls-native-tls: Using the native TLS library for secure connections.
- postgres: Enabling PostgreSQL as the database.
Install SQLX CLI
To use SQLX features like database migrations or checking SQL queries at compile-time, you can install the SQLX CLI globally:
cargo install sqlx-cli --no-default-features --features native-tls,postgresOnce installed, you can run migrations and interact with your PostgreSQL database from the command line.
Create the Database
After setting up your Rust project and configuring SQLX, the next step is to create the PostgreSQL database. SQLX provides a simple command to create the database at the DATABASE_URL specified in your .env file.
Ensure the DATABASE_URL is Set
Make sure you have the DATABASE_URL environment variable set up in your .env file. The database URL is in the following format:
DATABASE_URL=postgres://<username>:<password>@<host>:<port>/<database>We'll replace the placeholders with the values of the PostgreSQL database we created earlier:
DATABASE_URL=postgres://postgres:password@localhost:5432/rust-axum-rest-apiRun the following command to add the DATABASE_URL to your .env file:
echo "DATABASE_URL=postgres://postgres:password@localhost:5432/rust-axum-rest-api" >> .envAdd the .env File to .gitignore
To make sure you don't accidentally commit sensitive information like passwords, add the .env file to your .gitignore:
echo "*.env" >> .gitignoreTo create the database, simply run the following command:
sqlx database createThis will create the rust-axum-rest-api database as specified in your DATABASE_URL.
Creating the Tables
Now that the database is set up, it's time to create migrations to define the tables in our schema. We will create two tables: users and posts in separate migration files.
Create the Users Table Migration
First, we will create a migration for the users table. Run the following command to generate a migration file for the users:
sqlx migrate add create_users_tableOpen the generated migration file and define the schema for the users table:
-- migrations/<timestamp>_create_users_table.sql

CREATE TABLE users (
    id SERIAL PRIMARY KEY,
    username TEXT NOT NULL UNIQUE,
    email TEXT NOT NULL UNIQUE,
    created_at TIMESTAMP DEFAULT NOW()
);
Create the Posts Table Migration
Create a migration for the posts table:
sqlx migrate add create_posts_table-- migrations/<timestamp>_create_posts_table.sql
CREATE TABLE posts (
id SERIAL PRIMARY KEY,
user_id INTEGER REFERENCES users(id) ON DELETE CASCADE,
title TEXT NOT NULL,
body TEXT NOT NULL,
created_at TIMESTAMP DEFAULT NOW()
);Apply the Migrations
Once the migration files are defined, apply them to the database by running:
sqlx migrate runThis command will apply both migrations, creating the users and posts tables in the database.
 Migrations Run
Connecting to the database
SQLX is a fully asynchronous library, so we need to install the Tokio runtime first to handle async operations. Add the tokio dependency to your Cargo.toml:
cargo add tokio -F fullUpdate the main function
Since we use the tokio runtime, we need to update the main function to be asynchronous by using the #[tokio::main] attribute.
#[tokio::main]
async fn main() {

}
Reading the environment variables
In order to read the DATABASE_URL environment variable, we'll use the dotenvy crate to load the environment variables from the .env file. Add the dotenvy dependency to your Cargo.toml:
cargo add dotenvyNow, let's load the environment variables from the .env file and establish a connection to the database.
use dotenvy::dotenv;
use sqlx::postgres::PgPoolOptions;

#[tokio::main]
async fn main() {
    dotenv().ok();
    let url = std::env::var("DATABASE_URL").expect("DATABASE_URL must be set");
}
Creating a Database Connection Pool
use dotenvy::dotenv;
use sqlx::postgres::PgPoolOptions;

#[tokio::main]
async fdn main() -> Result<(), sqlx::Error> {
    dotenv().ok();
    let url = std::env::var("DATABASE_URL").expect("DATABASE_URL must be set");
    let pool = PgPoolOptions::new().connect(&url).await?;
    println!("Connected to the database!");

    Ok(())
}
Ensuring Database connection
Let's run the code to ensure that the database connection is working as expected.
cargo run Connected to the Database
Setting Up the REST API with Axum
Now that we have our database set up and connected, we can now start building the REST API.
Installing Dependencies
To begin, we need to install Axum for handling web requests, Serde for serializing and deserializing JSON, tracing for structured logging, and tracing_subscriber for handling log formatting and output.
Install the necessary dependencies by running:
cargo add axum serde tracing tracing_subscriber --features serde/deriveThis will install Axum, serde (with derive feature for easier struct handling), and tracing along with tracing_subscriber for logging.
Writing a Simple "Hello World" with Axum
To test our setup, let's write a simple starter code that responds with "Hello, world!" on the root route and logs when the server is ready.
use axum::{
    routing::get,
    Router,
};
use tracing::{info, Level};
use tracing_subscriber;

#[tokio::main]
async fn main() -> Result<(), sqlx::Error> {
    // initialize tracing for logging
    tracing_subscriber::fmt()
        .with_max_level(Level::INFO)
        .init();

    dotenv().ok();
    let url = std::env::var("DATABASE_URL").expect("DATABASE_URL must be set");
    let pool = PgPoolOptions::new().connect(&url).await?;
    info!("Connected to the database!");

    // build our application with a route
    let app = Router::new()
        // `GET /` goes to `root`
        .route("/", get(root));

    // run our app with hyper, listening globally on port 5000
    let listener = tokio::net::TcpListener::bind("0.0.0.0:5000").await.unwrap();
    info!("Server is running on http://0.0.0.0:5000");
    axum::serve(listener, app).await.unwrap();

    Ok(())
}

// handler for GET /
async fn root() -> &'static str {
    "Hello, world!"
}
This looks a bit cluttered, so let's break it down:
Let's see what this block of code is doing:
// initialize tracing for logging
tracing_subscriber::fmt()
    .with_max_level(Level::INFO)
    .init();
This code initializes the tracing subscriber with a maximum log level of INFO. This will allow us to log messages at the INFO level and above.
dotenv().ok();
let url = std::env::var("DATABASE_URL").expect("DATABASE_URL must be set");
let pool = PgPoolOptions::new().connect(&url).await?;
info!("Connected to the database!");
This is pretty easy to understand. We're loading the environment variables from the .env file, reading the DATABASE_URL variable, and establishing a connection to the database. If the connection is successful, we log a message saying "Connected to the database!".
let app = Router::new()
    .route("/", get(root));
This block creates a new Router and defines a route for the root path / that responds with the root handler function.
// run our app with hyper, listening globally on port 5000
let listener = tokio::net::TcpListener::bind("0.0.0.0:5000").await.unwrap();
info!("Server is running on http://0.0.0.0:5000");
axum::serve(listener, app).await.unwrap();
This code binds the server to port 5000 and starts serving the application. It logs a message saying "Server is running on http://0.0.0.0:5000 when the server is ready.
async fn root() -> &'static str {
    "Hello, world!"
}
This code defines the root handler function that returns the string "Hello, world!" when the root path / is accessed.
Now that we have a basic setup of Axum, let's move on to building the REST API with CRUD operations for managing posts and users.
Axum's Extension Layer
To share data between handlers which work on different threads, Axum uses Extension Layers to pass shared data between handlers. This allows you to share resources like database connections, configuration, or other data across your application. Ensuring thread safety and efficient resource sharing.
Let's create an extension layer for our database connection pool.
#[tokio::main]
async fn main() -> Result<(), sqlx::Error> {
    dotenv().ok();
    let url = std::env::var("DATABASE_URL").expect("DATABASE_URL must be set");
    let pool = PgPoolOptions::new().connect(&url).await?;

    tracing_subscriber::fmt().with_max_level(Level::INFO).init();

    let app = Router::new()
        // Root route
        .route("/", get(root))
        // Extension Layer
        .layer(Extension(pool));

    let listener = tokio::net::TcpListener::bind("0.0.0.0:5000").await.unwrap();

    info!("Server is running on http://0.0.0.0:5000");
    axum::serve(listener, app).await.unwrap();

    Ok(())
}
Note that wherever the layer is defined in the router chain, it will make it available to all the handlers defined after it. So, since we want this connection to be available to all the handlers, we define it as the last item of the chain.
Now the database connection can be easily extracted in any handler and shared between threads.
GET /posts Route
Let's create the first route for our API to retrieve a list of all posts.
Defining the Post Struct
Before defining the handle, let's first define the Post struct which will be the data type that we require from the database and the same data type that we send as the response to the client.
#[derive(Serialize, Deserialize)]
struct Post {
    id: i32,
    user_id: Option<i32>,
    title: String,
    body: String,
}
Remember we installed serde with the feature derive, that particular feature let's us derive the Serialize and Deserialize traits for our struct, so that it can easily be converted to and from JSON.
Handler for GET /posts
Now, let's define a handler function that queries the database for all posts and returns them as a JSON response.
async fn get_posts(
    Extension(pool): Extension<Pool<Postgres>>
) -> Result<Json<Vec<Post>>, StatusCode> {
    let posts = sqlx::query_as!(Post, "SELECT id, title, body FROM posts")
        .fetch_all(&pool)
        .await
        .map_err(|_| StatusCode::INTERNAL_SERVER_ERROR)?;

    Ok(Json(posts))
}
Using the query_as! macro from sqlx we can execute a query and map the result to a struct. In this case, we're fetching all the posts from the posts table and mapping them to the Post struct. The fetch_all method fetches all the rows from the query result and returns them as a Vec<Post>.
Notice the return type of the handler function is Result<Json<Vec<Post>>, StatusCode>. This allows us to return a JSON response with the list of posts if the query is successful, or an INTERNAL_SERVER_ERROR status code if an error occurs.
Adding the handler to the Router
Now that our handler is defined, we can add it to the router to handle the GET /posts route.
use axum::{extract::Extension, routing::get, Json, Router};

#[tokio::main]
async fn main() -> Result<(), sqlx::Error> {
  ...

  let app = Router::new()
      .route("/posts", get(get_posts))
      .layer(Extension(pool));

  ...
  Ok(())
}
Our first route is now ready, but there is no data to be fetched yet. Let's continue with the other routes and in the end we'll test them all.
GET /posts/:id Route
This one is a bit different, because we're accepting some data which is the id of the post that is coming from the URL path /posts/:id. Axum provides a way to extract this data from the URL path using the Path extractor.
The Path extractor is used to extract a single segment from the URL path. In this case, we're extracting the id of the post from the URL path /posts/:id.
async fn get_post(
    Extension(pool): Extension<Pool<Postgres>>,
    Path(id): Path<i32>,
) -> Result<Json<Post>, StatusCode> {
    let post = sqlx::query_as!(
        Post,
        "SELECT id, user_id, title, body FROM posts WHERE id = $1",
        id
    )
    .fetch_one(&pool)
    .await
    .map_err(|_| StatusCode::NOT_FOUND)?;

    Ok(Json(post))
}

#[tokio::main]
async fn main() -> Result<(), sqlx::Error> {
    dotenv().ok();
    let url = std::env::var("DATABASE_URL").expect("DATABASE_URL must be set");
    let pool = PgPoolOptions::new().connect(&url).await?;

    tracing_subscriber::fmt().init();

    let app = Router::new()
      .route("/posts", get(get_posts))
      .route("/posts/:id", get(get_post))
      .layer(Extension(pool));

    let listener = tokio::net::TcpListener::bind("0.0.0.0:5000").await.unwrap();
    info!("Server is running on http://0.0.0.0:5000");
    axum::serve(listener, app).await.unwrap();

    Ok(())
}
POST /posts Route
Now, let's implement the route to create a new post. This route will accept a JSON payload and insert the post into the database.
Since we are accepting some data from the client, we need to deserialize that data which is a JSON payload, in order to do that, we define a new struct for the payload named CreatePost and derive the Serialize and Deserialize traits for it.
Using the Json extractor, we can extract the JSON payload from the request body and deserialize it into the CreatePost struct.
#[derive(Serialize, Deserialize)]
struct CreatePost {
    title: String,
    body: String,
    user_id: Option<i32>,
}

async fn create_post(
    Extension(pool): Extension<Pool<Postgres>>,
    Json(new_post): Json<CreatePost>,
) -> Result<Json<Post>, StatusCode> {
    let post = sqlx::query_as!(
        Post,
        "INSERT INTO posts (user_id, title, body) VALUES ($1, $2, $3) RETURNING id, title, body, user_id",
        new_post.user_id,
        new_post.title,
        new_post.body
    )
    .fetch_one(&pool)
    .await
    .map_err(|_| StatusCode::INTERNAL_SERVER_ERROR)?;

    Ok(Json(post))
}

#[tokio::main]
async fn main() -> Result<(), sqlx::Error> {
  ...
  let app = Router::new()
    .route("/posts", get(get_posts).post(create_post))
    .route("/posts/:id", get(get_post))
    .layer(Extension(pool));
  ...
}
This route creates a new post and returns the created data.
PUT /posts/:id Route
This one is a bit similar to the POST /posts route, but instead of creating a new post, we're updating an existing post. We need to accept the id of the post to be updated and the updated data in the JSON payload.
#[derive(Serialize, Deserialize)]
struct UpdatePost {
    title: String,
    body: String,
    user_id: Option<i32>,
}

async fn update_post(
    Extension(pool): Extension<Pool<Postgres>>,
    Path(id): Path<i32>,
    Json(updated_post): Json<UpdatePost>,
) -> Result<Json<Post>, StatusCode> {
    let post = sqlx::query_as!(
        Post,
        "UPDATE posts SET title = $1, body = $2, user_id = $3 WHERE id = $4 RETURNING id, user_id, title, body",
        updated_post.title,
        updated_post.body,
        updated_post.user_id,
        id
    )
    .fetch_one(&pool)
    .await;

    match post {
        Ok(post) => Ok(Json(post)),
        Err(_) => Err(StatusCode::NOT_FOUND),
    }
}

#[tokio::main]
async fn main() -> Result<(), sqlx::Error> {
  ...
  let app = Router::new()
    .route("/posts", get(get_posts).post(create_post))
    .route("/posts/:id", get(get_post).put(update_post))
    .layer(Extension(pool));
  ...
}
DELETE /posts/:id Route
This route will be a bit different, because we are deleting the post, and there is no data to return after the deletion. So, we need to handle the response accordingly.
We want to return a message like successful or Post deleted successfully.
We can create a new struct for that response like this:
#[derive(Serialize)]
struct Message {
    message: String,
}
But this isn't very convenient always creating a new struct for a response. Luckily, there's a better way to create custom JSON responses, by using an external library that provides us with a macro called json!
The library is called serde_json, add it to your project:
cargo add serde_jsonNow we can use it:
async fn delete_post(
    Extension(pool): Extension<Pool<Postgres>>,
    Path(id): Path<i32>,
) -> Result<Json<serde_json::Value>, StatusCode> {
    let result = sqlx::query!("DELETE FROM posts WHERE id = $1", id)
        .execute(&pool)
        .await;

    match result {
        Ok(_) => Ok(Json(serde_json::json! ({
            "message": "Post deleted successfully"
        }))),
        Err(_) => Err(StatusCode::NOT_FOUND),
    }
}

#[tokio::main]
async fn main() -> Result<(), sqlx::Error> {
  ...
  let app = Router::new()
    .route("/posts", get(get_posts).post(create_post))
    .route("/posts/:id", get(get_post).put(update_post).delete(delete_post))
    .layer(Extension(pool));
  ...
}
Notice the return type of the handler is Result<Json<serde_json::Value>, StatusCode>. This allows us to return a JSON response with any keys that we want, instead of having to define a struct for each response.
POST /users Route
Let's implement the route to create a new user. This route will accept a JSON payload from the client containing the username and email and insert the new user into the database.
#[derive(Serialize, Deserialize)]
struct CreateUser {
    username: String,
    email: String,
}

#[derive(Serialize, Deserialize)]
struct User {
    id: i32,
    username: String,
    email: String,
}

async fn create_user(
    Extension(pool): Extension<Pool<Postgres>>,
    Json(new_user): Json<CreateUser>,
) -> Result<Json<User>, StatusCode> {
    let user = sqlx::query_as!(
        User,
        "INSERT INTO users (username, email) VALUES ($1, $2) RETURNING id, username, email",
        new_user.username,
        new_user.email
    )
    .fetch_one(&pool)
    .await
    .map_err(|_| StatusCode::INTERNAL_SERVER_ERROR)?;

    Ok(Json(user))
}


#[tokio::main]
async fn main() -> Result<(), sqlx::Error> {
  ...
  let app = Router::new()
    .route("/users", post(create_user))
    .route("/posts", get(get_posts).post(create_post))
    .route("/posts/:id", get(get_post).put(update_post).delete(delete_post))
    .layer(Extension(pool));
  ...
}
Testing the Routes
Now that we've implemented all the necessary routes for creating, updating, fetching, and deleting posts and users, let's try them out and interact with our API.
We'll first add data to the database using the POST routes and then fetch and manipulate that data using the GET, PUT, and DELETE routes.
To send the requests you can either use a tool like curl or Postman, or a VSCode extension like Thunder Client. We'll use Thunder Client in this tutorial.
First, make sure the server is running by running the following command in the terminal:
cargo run Server running
Adding data
We don't have any data in the database yet, so let's start by adding some users and posts.
- POST /users: Send a
POSTrequest to/userswith a JSON body containing theusernameandemailof the new user.
{
  "username": "rustfinity",
  "email": "rustfinity@example.com"
}
POST /users
Great! Seems like the user was added successfully and our API is working as expected, let's add a new post.
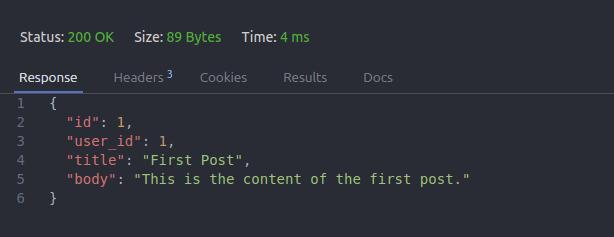
- POST /posts: Let's send a post request to
/postswith a JSON body containing thetitle,body, anduser_idof the new post.
{
  "title": "First Post",
  "body": "This is the content of the first post.",
  "user_id": 1
}
POST /posts
We'll do this a few times to have more posts in the database.
Fetch Data with GET /posts and GET /posts/:id
After adding some posts, we can fetch all the posts or a specific post using the GET routes.
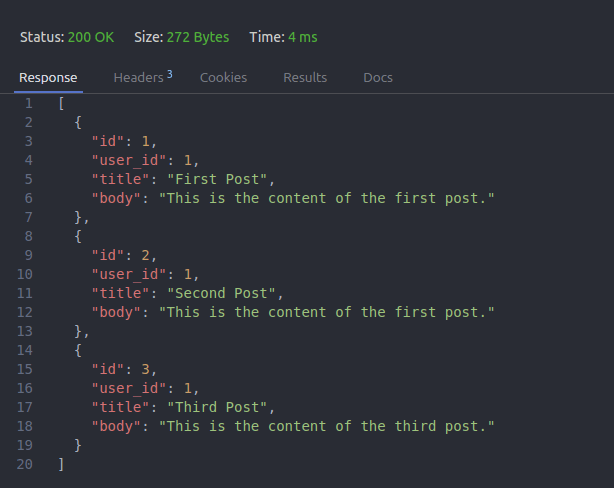
Let's test the GET /posts route by sending a GET request to /posts. This will return a list of all posts in the database.
 GET /posts
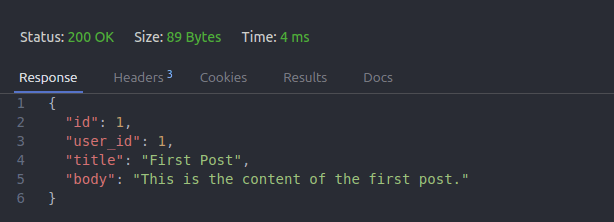
- GET /posts/:id: Fetch a specific post by sending a
GETrequest to/posts/1(or any valid post ID). This will return the details of the requested post.
 GET /posts/:id
Update Data with PUT /posts/:id
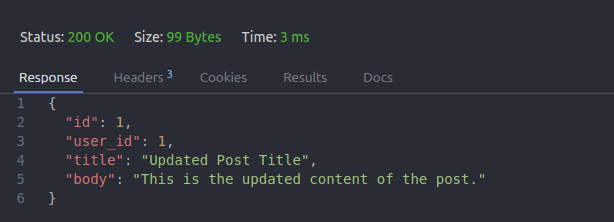
Let's test the update functionality by sending a PUT request to /posts/:id with the updated data.
{
  "title": "Updated Post Title",
  "body": "This is the updated content of the post."
}
PUT /posts/:id
Delete Data with DELETE /posts/:id
Finally, let's test the delete functionality by sending a DELETE request to /posts/:id to delete a specific post.
 DELETE /posts/:id
Great! All of our API routes worked exactly as expected, and we were able to interact with the database to create, read, update, and delete posts and users.
Conclusion
In this tutorial, we've built a complete REST API using Rust with Axum and SQLX. We started by setting up the API to handle creating, fetching, updating, and deleting both users and posts. Along the way, we utilized Serde for JSON serialization and Tokio as our async runtime. By using SQLX, we were able to seamlessly interact with our PostgreSQL database, ensuring efficient data management.
By now, you should have a foundational understanding of how to build a high-performance REST API with Rust and Axum.
You can now extend this API and add more functionality, try to challenge yourself to add more routes like updating users, deleting users, or even adding more complex queries to fetch data from the database.
Thanks for reading, if you enjoyed this blog post, you'll enjoy our other blogs at our blogs page, and you can learn Rust by practicing and solving challenges at Rustfinity challenges section.